- Turbidity Curtains are typically shipped bundled on pallets and covered with shrink wrap. Upon arrival, each item should be inspected for shipping damage. If damage exists, a claim should be filed with the shipper. Be careful removing the shrink wrap and tie-down straps so as not to cut the turbidity curtain. The turbidity curtains are packaged with the skirt folded accordion-style and secured to the flotation elements with orange or black straps. Leave these straps in place for now.
- Formulate an anchoring plan. Identify how you will anchor or moor the turbidity curtains. Key factors to consider include wind, waves, currents, tides, water depths, bottom conditions and boat traffic in the area.
- Select the appropriate anchor type. Danforth style anchors are most commonly used based on price, availability, and ease of use, and should be used with a chain between the anchor and line. Danforth anchors require a firm silt, mud or sand bottom to work effectively. Pyramid anchors can be much heavier (up to 4000 pounds) and combine friction and suction within the bottom material for holding strength. The pyramid (or deadweight) anchors work better on rocky or hard bottoms. Beach stakes, shore anchors, and existing pilings can also be utilized to secure turbidity curtains into place.
- Set anchors and mooring lines before deploying the turbidity curtains into the water. Mark attachment points with buoys.
- When moving the turbidity curtains, care should be taken not to drag them on the ground. Sufficient manpower should be used to lift the turbidity curtain sections to the water’s edge, or onto a work boat. The turbidity curtains should be arranged in an accordion pattern so they can be pulled into the water with minimal dragging.
- Position the leading edge of the turbidity curtain closest to the water, and connect a tow bridle (Figure 1) to the leading end of the containment boom. The tow bridle distributes the force evenly across the end of the turbidity curtain and provides a secure connection as the turbidity curtain is towed. The turbidity curtain should be arranged in an accordion pattern so it can be pulled into the water with minimal movement out of water.
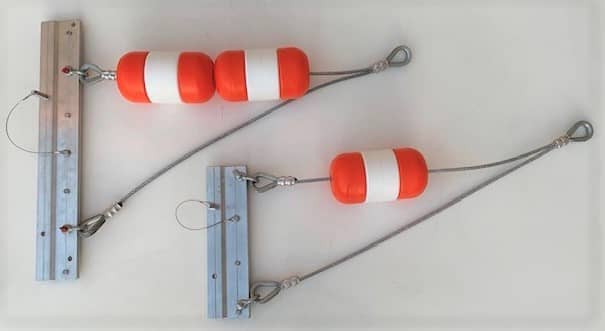
Figure 1 - Tow Bridles
- On shore (or work boat), connect the turbidity curtain sections end to end. Only remove the first few straps on each end in order to unfurl the skirt and connect the sections. Leave the remainder of the curtain "furled" with straps to make deployment easier. Once deployed the straps should be removed in order to release the skirt to full depth. The aluminum connectors (if applicable) on each end of the boom should be engaged and locked together with toggle pins (Figure 2). Some turbidity curtains do not have connector plates, and instead only offer grommets. Regardless, all grommets in the side seams should be aligned and connected. The grommets can be connected by heavy duty cable zip ties, stainless steel nuts and bolts, or tied together with rope. When using zip ties or rope to connect the grommets, overlap the ropes welded into the side seams against each other and cinch tightly so that the ropes provide additional holding strength (Figure 3). If using nuts and bolts to connect the grommets, be sure the hardware is sized appropriately so that it can’t pull through the opening in the grommet (Figure 4). Gently tow the turbidity curtain out with the tow bridle, forming a floating curtain train as it is deployed.
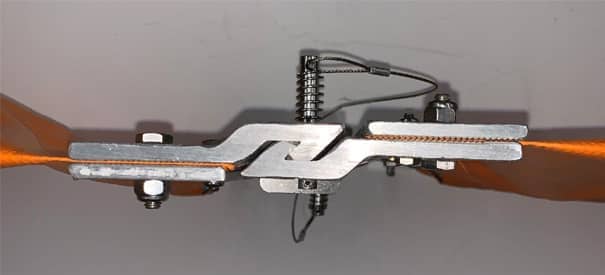
Figure 2 - End Connectors Secured with Toggle Pin
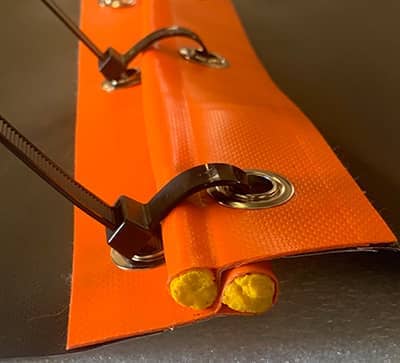
Figure 3 - Grommets Connected with Cable Zip Ties
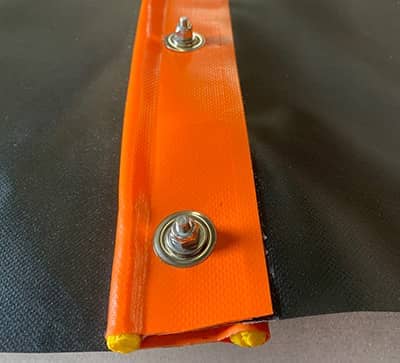
Figure 4 - Grommets Connected with Stainless Nuts and Bolts
- Secure the turbidity curtain at the appropriate anchor points per the plan. Tow bridles can also be used as sturdy end connection points.
- Release furling lines if applicable to release the curtain to full depth.
- Monitor the deployed turbidity curtain to ensure the anchors are maintaining the floating curtain in the proper location. Adjust as needed.
- Consider the use of lighted beacons at intervals along the turbidity curtain string to allow for identification by boaters and to monitor the location of the turbidity curtain at night.
- The bottom of the turbidity curtain should not reach the bottom, even at low tide. At least a foot of clearance between the bottom and the ballast chain of the turbidity curtain is recommended. This prevents silt from building up on any portion of the curtain that may be laying on the bottom, resulting in the curtain being pulled below the water surface. Optional furling lines (reefing lines) can be used to adjust the depth of the turbidity curtain.
- Periodically monitor the position of the turbidity curtain while in use. Reposition as needed to keep the turbidity curtain off the bottom surface below the water.
- Inspect the deployed turbidity curtain monthly to assess UV damage, float condition, chemical damage, or the build-up of marine life that may need to be brushed or power washed off the turbidity curtains.
Anchoring Plans
- Water and weather conditions can dictate what anchoring plan may work best.
- Tides and currents can result in the need for anchor kits being deployed in opposite directions.
- Bottom composition also plays an important factor in anchor type selection (see #2 in instructions above).
- Anchor lines should be at least 3 times the maximum depth (high tide) of the water for Danforth anchors and 1.5 times the maximum depth for Pyramid anchors.
- Danforth anchors should always have chains between the anchor and line, as the weight helps to keep the anchor from pulling up and losing its grip.
- Anchors should be placed at a minimum every 100 feet along the run of containment boom. More frequent anchor points may be required to securely hold the containment boom in the optimal location.
The next three diagrams below illustrate the components and arrangement of an effective anchoring system. The scenarios depicted include a simple single anchor layout for calm water deployment (Figure 5), a double anchor layout where current, tides, or winds may require additional holding strength (Figure 6), or a layout requiring anchors in both directions where tides and currents change directions (Figure 7).
Single Anchor Configuration for Each Anchor Point
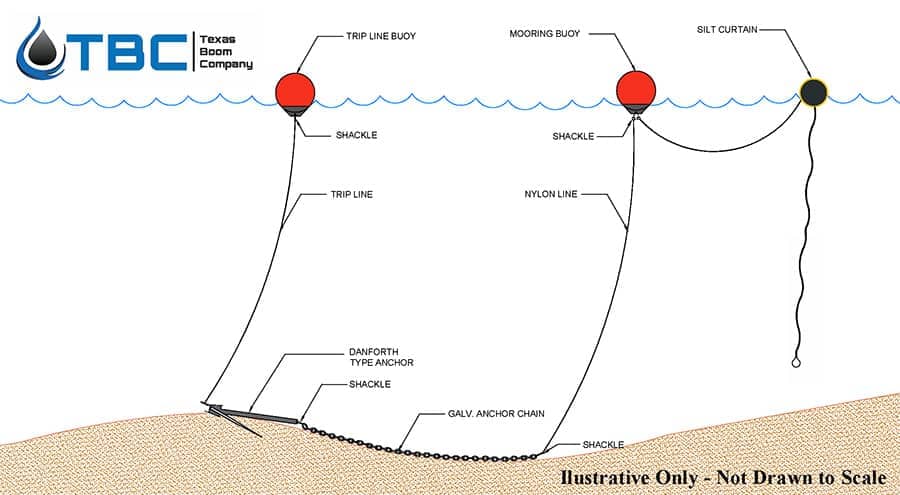
Figure 5
Double Anchor Configuration for Each Anchor Point
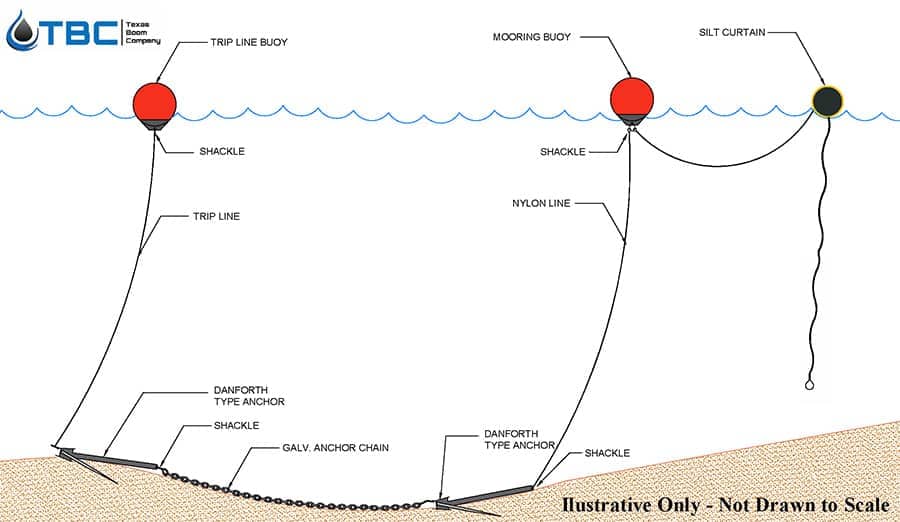
Figure 6
Dual Direction Anchor Configuration for Each Anchor Point
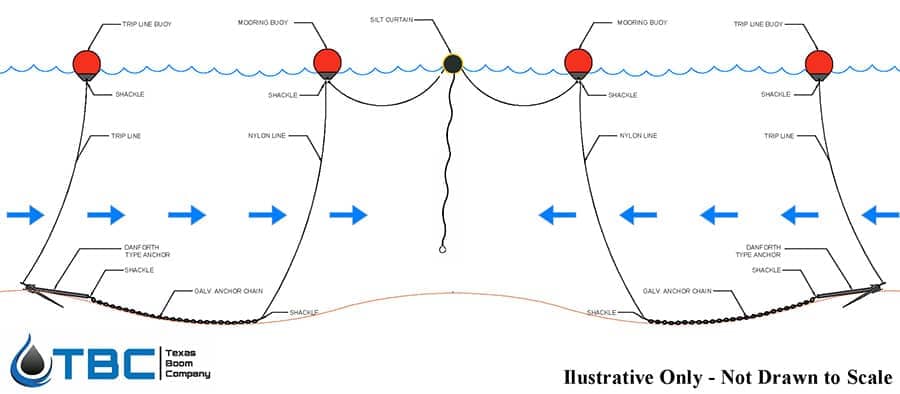
Figure 7
Turbidity Curtain Retrieval
- Before removing turbidity, be sure to allow time for all the silt to settle to the bottom.
- After use, the turbidity curtain should be removed for disposal or to be cleaned, packed and stored. If the turbidity curtain is to be reused, it is important to avoid dragging it over sharp objects or abrasive surfaces that can damage the fabric. If the turbidity curtain has furling or reefing lines, the curtain skirt should be raised and tied off while the turbidity curtain is still in the water. If conditions allow, bundle the curtain skirt below the floats and tie off over the length of the deployed turbidity curtain.
- Disconnect one end of the turbidity curtain string and connect it to the tow boat (if needed).
- Disconnect each of the subsequent anchor points and tow the turbidity curtain to shore or haul the turbidity curtain aboard the work boat.
- Deploy enough manpower to allow that each section of the turbidity curtain can be stacked in an accordion (zig-zag) pattern into a neat bundle.
- Strap each section to keep it contained for transport.
- Take care when loading each section to avoid dragging, which may result in damage to the curtain.
- At an appropriate location, spread each turbidity curtain for cleaning, rinsing, and drying. Most industrial detergents can be used but test a small area before proceeding. Mops or brushes can be used. Should a power washer be used, exercise caution as the water jet can cause damage to the fabric if not performed properly.
- After cleaning, inspect each curtain for tears or punctures and repair as needed. Texas Boom Company offers repair kits as an accessory.
- After letting the turbidity curtain fully dry, refold the curtain skirt to be bundled under the float and tie off each segment. Fold each segment in an accordion pattern and strap securely for storage and subsequent deployment.
- For turbidity curtains that have been exposed to oil or other contaminants, evaluate the cost benefit analysis of cleaning the contaminated turbidity curtain versus replacing it. Often replacement is a more economical option. Also evaluate the overall condition of the turbidity curtain and evaluate remaining product life. Adhere to follow all local, state and Federal laws when disposing of contaminated turbidity curtains.
Turbidity Curtain Storage
- Turbidity curtains should be stored in a dry location, out of the sun, and in a location that affords air circulation.
- If turbidity curtains are stored in a trailer or shipping container, having air circulation inside the confined space will extend the life of the product.
- Stored turbidity curtains should be fully removed from storage, unfolded, and inspected at a minimum every six months. As the turbidity curtains are refolded, they should be folded in reverse of the accordion pattern from the time it was previous folded so that each fold is in the opposite direction.
- Repair or replace turbidity curtains that have been significantly damaged or shows degradation.
- Be mindful of pest control in the storage area, as rodents can damage the turbidity curtains over time if allowed access to stored bundles.
- When in doubt, throw it out. Error on the side of caution and maintain an inventory of fully functional turbidity curtains that are in good condition.